FEATURE
Using Web Scraper Extension for Data-Intensive Projects
by Louisa Verma
Have you ever been confronted with a project requiring repetitive copy/paste from a website when trying to compile data that isn’t easily exportable?
I’ve found that Web Scraper (webscraper.io) is a useful tool in these situations. Web Scraper is a developer tool that can be installed as a browser extension (available on Chrome, Edge, and Firefox). The free version provides basic scraping functions. Paid versions allow for more advanced features, such as scheduling of scraping and automatic saving of site map revisions.
Here are examples of how it might be used by librarians:
- Importing data into a database
- Cataloging
- Data analysis
- Thesaurus building
- Business intelligence
The largest project I’ve used it on was to create and update a customized database of regulatory comments. The project required that all regulatory comments posted from my organization, and from as many years back as possible, be saved to a searchable database. Although I was provided with PDFs of the comments, I discovered that using Web Scraper to scrape data from Regulations.gov would save me from having to input all the data fields manually.
Getting Started
After downloading and installing the extension on the browser that works best for you, open Developer Tools in Chrome or Firefox using Ctrl+Shift+I, or navigate from the account menu at the top right to More tools Developer tools (Chrome) or More Tools Web Developer Tools (Firefox), and click on the Web Scraper tab.

Screenshot of Web Scraper in Firefox
Navigate to the site from which you would like to scrape data. Not all sites lend themselves to being scraped with the free version. Those that include the query and parameters in the URL will be easier to scrape. My query on Regulations.gov was a search for comments containing the term microplastics limited to the last 30 days. To see the parameters, click on this link: regulations.gov/search/comment?filter=microplastics&postedDateFrom=2024-06-14&postedDateTo=2024-09-11. Look at the data to decide what data you will need to scrape and what pages and subpages will be scraped.
Web Scraper can scrape multiple data, aka “selectors,” per page as well as click down to subpages to scrape data. It pays to examine the site you want to scrape and think ahead a bit to determine which selectors are the parent and which are the child, This will impact how the data is organized on a spreadsheet. You also must define what type of selector to use for each data item.
Web Scraper has 12 different selector types, which can be used to scrape and organize data that is needed for a project. As an example, if the data you want to grab is a link, and you will also scrape data from the subpage, then use the selector type Link. This allows the selector to be a parent selector, and you can then add child selectors to grab data on the subpages.
How you set up your selectors and define them will depend on what data you are trying to scrape and on what pages the data resides. I always find it takes a couple of tries before hitting on the right combination of selector types and parent-child hierarchy.
Web Scraper has extensive documentation, tutorials, and screenshots to guide and demonstrate how to create what is called a “site map” under the LEARN menu of the main page. You can also click here: webscraper.io/documentation.
Creating a Site map
Once you’ve examined the page and know what data you want to scrape, you are ready to create your site map. Still using Regulations.gov as an example, search for microplastics, click on the comments tab, and then limit to the last 30 days.

Decide what data to scrape and where it resides.
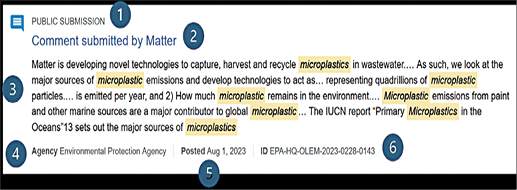
The following data can all be scraped on this page:
- Submission type
- Comment submitted by
- A block of contextual results showing where
the term microplastics appeared
- Government agency
- Date posted
- Comment ID
If I click on the Comment submitted by link for each result, I can see some of the same data and some additional data that might be of interest. Deciding first which data you want to scrape and where it resides will make it less time consuming when putting together the site map.
For the sake of simplicity, this example will walk you through scraping data from the results page without going into subpages.
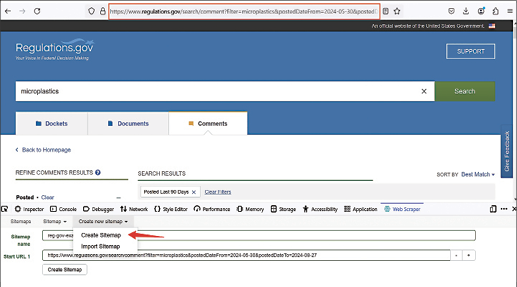
Select Create new site map from the pull-down menu of the same name.
Enter the site map name and the Start URL 1, which will be the URL from the first page of your search.

Create a site map
The plus (+) after Start URL 1 textbox allows you to add start URLs from the subsequent pages of your search. This works fairly easily in Regulations.gov, since you can clearly see the page number in the URL. If you had more than two pages of data, you could copy/paste this URL and edit the page number in the URL. Limiting to the past 30 days only gives one page of data. If you broadened your filter to the last 90 days or did a longer custom date range, there would be multiple pages of potential data that you might want to scrape. The Web Scraper documentation also gives guidance on specifying multiple URLs with ranges (webscraper.io/documentation/scraping-a-site).

Adding additional Start URLs
Select Create Sitemap when done. You will need to edit the Start URL textbox whenever you want to scrape newly added data on the site from which you are working. To edit the Start URL textbox, go back to your site map (if not there already), and from your site map pull-down menu, select the Edit metadata option.

Editing the Start URL
Add Selectors
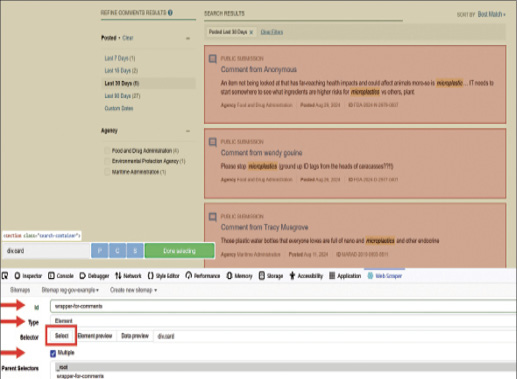
You are now ready to define selectors, which are the metadata/fields in which the data resides on each page to be selected by Web Scraper. Click on the Add new selector button. If you only want to pull data from the top-level search results page as in this example, you can do that by creating a “wrapper” selector. The wrapper selector in effect defines each record (column) for the spreadsheet that will be exported. Designate the wrapper as a parent by using selector type Element. There will be data from multiple comments scraped from each page, so click on the box next to Multiple.

Adding selectors
Now click on the Select button to start selecting which sections of the page will be scraped. Starting at the top of the page, hover your cursor until it highlights the entire section that your data will be pulled from. Use Shift+click to select multiple sections. After selecting a few, Web Scraper will automatically select the rest on the page. Click on the green Done selecting button. You can preview that the correct sections have been selected by clicking on the Element preview button. When additional selectors are added, the Data preview button will also be useful in ensuring that the site map is scraping correctly. For now, click on the Save selector button at the bottom of the screen.
Next, instead of adding more selectors at the same parent level, click on the wrapper selector to start adding child selectors (i.e., the fields in each record).

Click on the parent selector to add the child selectors.
Add additional selectors for the other data you want to scrape. These will all be Text type selectors and not Multiple since there will be only one per each record (e.g., one submitter, one agency, and so on). When you have finished, click the Data preview button to check what will be scraped.

Click Data preview to check that the data is being scraped correctly.

Data preview shows what will be scraped for each selector (field).
Scrape and Export the Data
Now comes the easy part: You are ready to scrape your data. To start, make sure that your Starting URL is correct. Then, from the site map pull-down menu, select Scrape, and click on the Start scraping button. You can choose to change the Request interval or the Page Load Delay, but it is usually sufficient to leave them at the default of 2000 ms. If you are finding that not all of your data is being scraped or other errors are happening with loading the page, experiment with changing these values. The Web Scraper documentation section on “Scraping a site” does a good job of defining these but not when to change them.
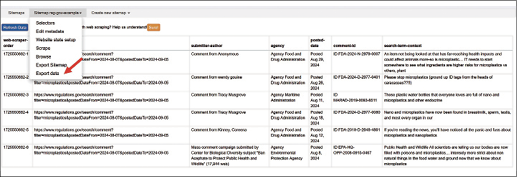
After you click on the Start scraping button, you will see the Start URL page load. When Web Scraper has finished scraping the Web Scraper window, click on the Refresh button to see if everything has scraped the way you want, then either copy and paste the entire table directly into a spreadsheet or select Export data from the site map menu to export in either CSV or XLSX formats.

Click refreshed to see the scraped data.

Copy and paste the table into a spreadsheet or select Export Data from the site map menu.

Download options
Exporting a Site map: When, Why, and How
You may have also noticed the Export Sitemap option on the site map menu. This is a handy option that allows you to move your site maps to a different browser or computer.

Export Sitemap
Essentially, this gives you the code that you will need to import into your new browser Web Scraper extension. Unlike bookmarks, browser extensions have to be reinstalled with each browser, so if you are upgrading your computer or need/want to switch browsers, it will be necessary to reinstall the Web Scraper extension. Site maps can be imported, but all site maps will be lost unless you’ve exported them first. It would be wise to export your site maps after you’ve created and refined each one. The code should be saved as plain text (.txt) in order to work when importing.
Importing a Site map
To import a site map, select Create new site map from the pull-down menu, then select Import site map.

Importing a site map
Copy and paste the code you saved into the site map JSON textbox, give your site map a name, and click Import Sitemap to save.

Importing a Sitemap (continued)
Conclusion
Web Scraper can definitely save a lot of time and tedious work and is potentially useful for many different applications. Here are a couple of limitations to keep in mind when using Web Scraper:
- Exported data will likely still need to be edited before being imported into a database or online catalog; however, this can be easier to accomplish when data is in a spreadsheet format.
- It can take time to develop an adequate site map for all of the data you want to scrape from a particular site. Sometimes, two separate site maps can be used and then combined into one.
- Web Scraper does not work easily with proprietary websites.
- Having a more in-depth understanding of HTML, CSS, and XML is beneficial in using Web Scraper to its full extent.
Even given these limitations, Web Scraper can be a useful tool, and even non-web developers can figure it out through experimenting with different selectors and selector types and seeing what happens.
|